Adding memory to height-adjustable table

I have a height-adjustable at work, but unfortunately it doesn’t have memory. Being the lazy person that I am, I designed and added a memory function to it using a ESP-8266 microcontroller. I also added control via Google Home, but it’s not very practical having to reach for my phone in order to adjust my table height. The final product and demonstration is below!

Connecting my Dumb TV to Google Home

Ever since my wife and I received a free Google Home Mini from Spotify not long ago, we have been on this downward spiral of laziness and not wanting to physically move at all to do anything in the house. Alas we had a dumb TV, which meant that we had to experience the excruciating process of finding the TV remote, lifting it, and pressing the big red button on it every day. To avoid this daily torture, I decided to convert my dumb TV to a smart TV by connecting it to Google Home.

Making a Boxing Wraps Roller and Container

I have always been frustrated with the tediousness of rolling up my boxing wraps by hand every time after training or washing them, so recently I designed and 3d-printed a container which doubles up as a roller for my boxing wraps.

Making Our DIY Wooden Rings

This summer Rachel and I went to a woodworking workshop to make our own wooden rings. I never really understood how a metal band is supposed to signify our commitment to each other, so before we buy our actual rings, I figured that the experience of making rings ourselves would be a little more fun and meaningful. Neither of us have much experience in woodworking, so we took the lathe-turning workshop at Tombalek to learn the basic skills required.

Making a DIY Hologram

I recently saw an article that teaches you how to make a very simple hologram with a bit of plastic and a phone. I’ve always been fascinated by holograms, so I decided to make one for my girlfriend as a little gift and have a bit of fun in the process.

Electronics Workshop

I am running a free electronics workshop for complete beginners. If you ever wanted to find out what goes on behind the scenes in your smartphone, or how to automate simple tasks with electronics, this workshop will be perfect for you. You will acquire a high-level understanding of the basics of electronics, as well as get a hands-on experience with creating and programming an electronic toy.

The sign-up link can be found here.

Everyone will get a set of the components pictured above for the hands-on workshop.

Here is an overview of the topics that I’ll cover -

  • Bit & bytes
  • Highs and lows
  • Hands-On
    • Blinking LED
    • Button as input
    • Playing melody

Before coming, it is very important that you download and install the following programs.

Materials can be found here.

Project Make-Possible

At the start of this summer a few friends and I participated in a makerthon called Project Make-Possible, jointly organised by the student chapters of Institute of Engineers as well as Engineers Without Borders Asia. Project Make-Possible is an initiative to introduce and promote the spirit of humanitarian engineering amongst students in NUS. Over the course of a week, we were exposed to humanitarian efforts in engineering, as well as workshops teaching us the basics of engineering skills such as 3D printing and laser cutting. There was a site visit to SPD as well.

We were given three problem statements to choose from. Here is the one which we chose:

PWDs (persons with disabilities) find it hard to manage many different electronic devices (such as handphones, iPads, laptops) due to their limited mobility and lack of “holder” accessories to secure these devices for the wheelchair. There is no inter-device communication application that a PWD can use to access all his devices on a single platform.

After the workshop and the site visits, we were given time to brainstorm and come up with a solution for this problem. Our group’s idea was simple - if PWDs find it hard to manage their electronic devices on the existing tray attached to their wheelchair, we will redesign it to be more user-friendly.

Our solution

Components

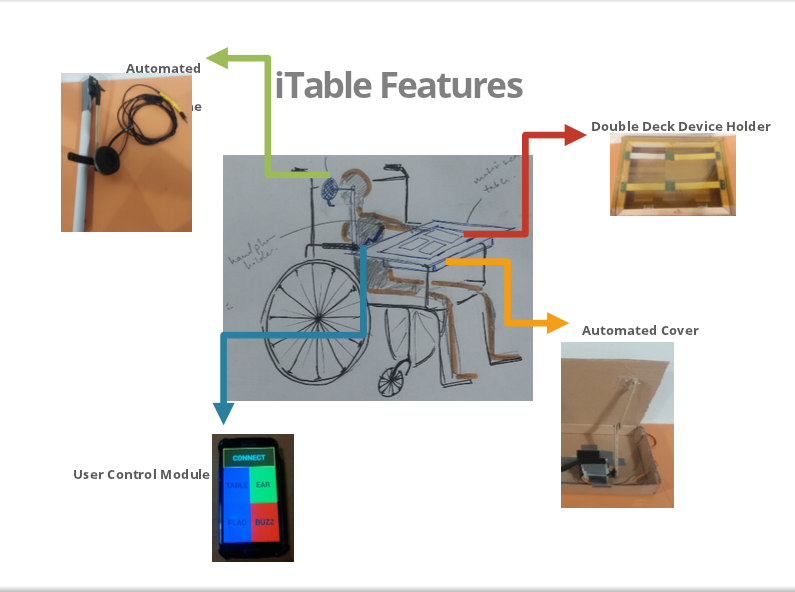
To that end, our design consists of a double-deck device holder, where the laptop will be kept below the transparent cover, and mobile devices can be strapped to the bottom of the cover. The upside of doing this is that touch-enabled devices can still be used and it prevents theft as everything is now kept underneath the cover.

Additionally, the device will be motorized, utilizing bluetooth connection to be controlled by an app we created on the Android platform. There are three other functions which the app is capable of - automatically swinging headphones when the user receives a call, flagging down a vehicle, as well as buzzing to get attention. This user control module (aka handphone) will be separately mounted on the armrest of the wheelchair.

You can see the end product in action below.

Judging

In the end, we were chosen by the judges and came first in our problem statement. The prize is of course funding to continue the project and to come up with a working prototype, so it’s not the end just yet! A big shout out to all the organizers of this event! It was really fun and I learnt a lot along the way.

Components

Making keychain flashlights

It’s the end of the school semester, and a lot of my seniors in college are leaving this place. It’s sad, but as the Chinese saying goes, there is no banquet that never ends. I wanted to do something so they can remember this place, and I thought what could be better than a small keychain which you can hang on your bag and whenever others ask you about it, you can fondly recount “Back in the days when I was in CAPT…”

So, here I detail the process of designing and making these little things.

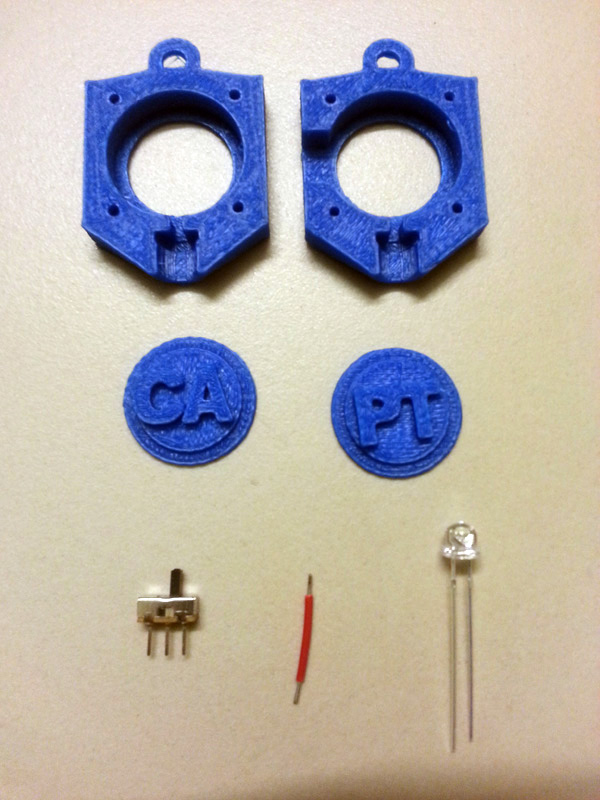
Components used

  • Wide-angle white LED
  • Switch
  • Keychain
  • 3D-printed model

Components

1. Designing the cover

Originally, I wanted to buy a some battery holders and incorporate that into the design, but after walking through Sim Lim Tower for a morning I couldn’t find what I needed, so I decided to 3D-print everything instead. I downloaded a generic keychain flashlight from Thingiverse, and started by designing the plates which will spell out the words CAPT. After tweaking the dimensions and putting holes to hold the switch and the plates, it was ready to print. Going through a few revisions, I eventually got what I wanted.

Components

2. Wiring the insides

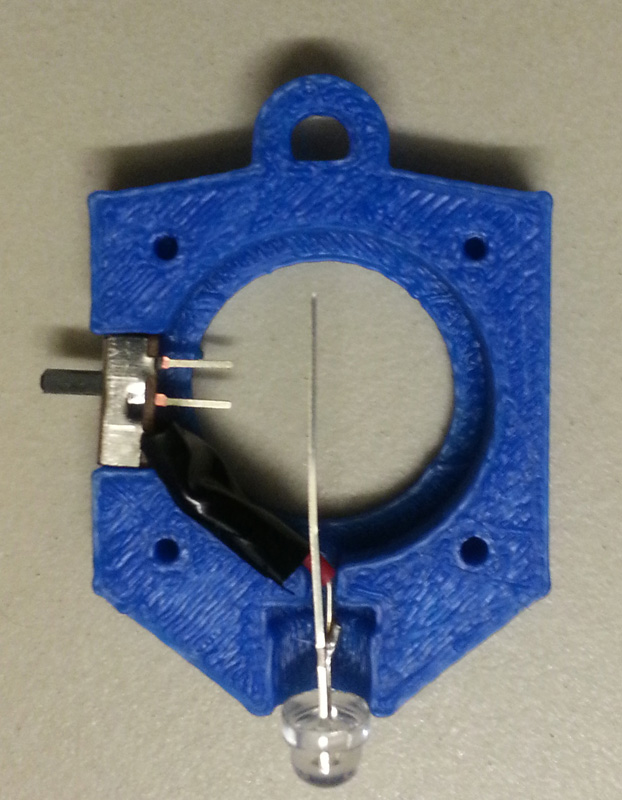
The insides were pretty simple to setup. I connected one end of the LED to the switch, and the other one will touch the positive end of the button cells. The switch closes the circuit by touching the negative end of the button cells. The end product looked like this.

Components

3. Glueing it together

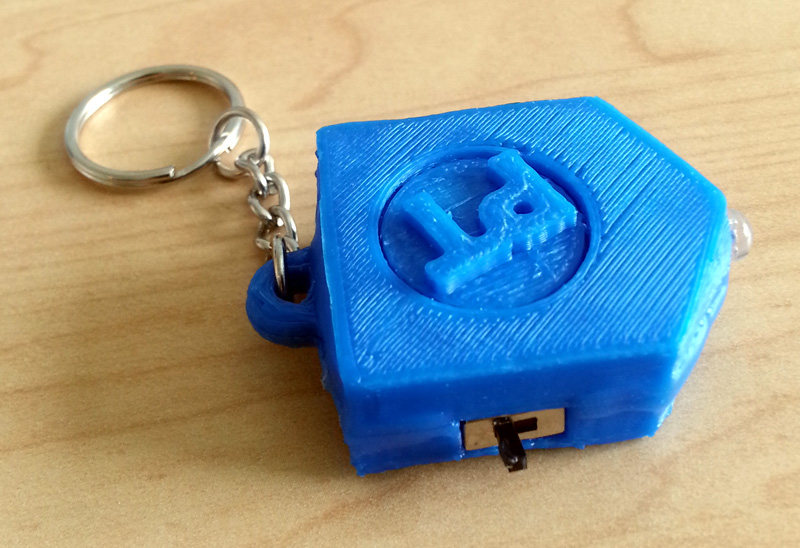
After this is done, the rest was just putting on the keychain and glueing it together. Special thanks to my friend Yvonne who lent me her glue gun. The finished product is shown below

Components Components

How to set up a wireless printer server

Recently my senior (and dear friend) left Singapore for exchange in London, and left me his printer as part of his legacy. I didn’t really want to keep it in my room, and since it’s a wired printer, I had to find a way to make it wireless. Fortunately, NUS Hackers had a Raspberry Pi lying around which no one was using, so I sought to make full use of it and acquaint myself with the Pi at the same time.

Components

The first step, of course, is to find an SD card which acts as the hard drive for the Pi. You can buy one preloaded with NOOBS, the operating system, on their website, or you can download NOOBS onto any existing SD card which you might own. In my case, I bought one from the local Co-op and loaded NOOBS myself. At the same time, I grabbed a Wi-fi dongle from my deceased desktop, which I’ll be needing later.
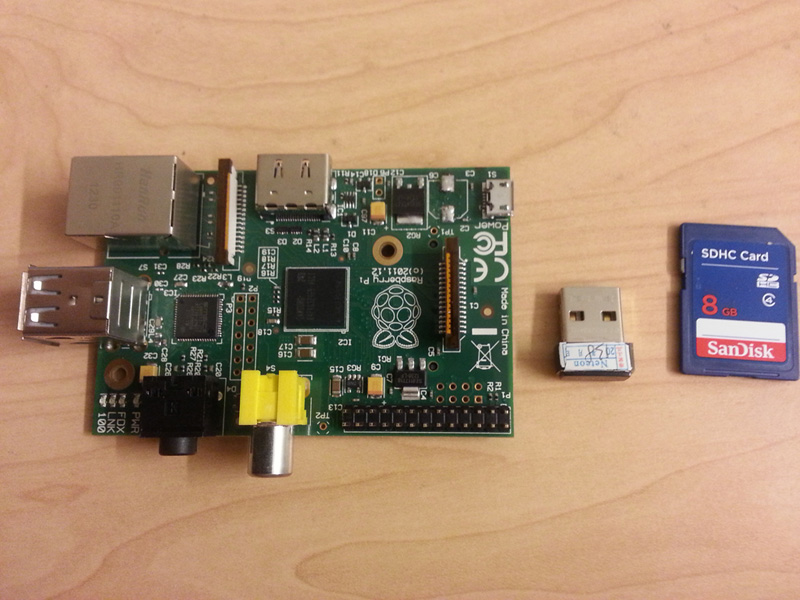
Components

1. Enable SSH

After booting up the Pi, the first thing that you’ll want to do is to enable ssh. This way, you can control the Pi just by having it plugged into the local network, instead of having to connect it to a screen and keyboard every time.

You can do this by entering sudo raspi-config in the terminal, then navigate to ‘Advanced Options’, and enable ssh server under ‘SSH’.

2. Set up wireless dongle

Unfortunately, my wireless dongle, a TP-Link TL WN725N V2, did not work out of the box. However, a simple Google search led me to a site where all the drivers are available. If your wireless dongle is a different model, just search for its drivers online. Before downloading the driver, make sure that it’s for the right version of the Pi that you have. If you’re unsure, do a uname -a to find your Pi’s current version. After that, follow the commands below to install the driver. Note that you’ll have to connect your Pi using the LAN port to download the driver.

wget https://dl.dropboxusercontent.com/u/80256631/8188eu-201xyyzz.tar.gz //make sure it's the right version!
tar -zxvf 8188eu-201xyyzz.tar.gz
sudo install -p -m 644 8188eu.ko /lib/modules/$(uname -r)/kernel/drivers/net/wireless
sudo insmod /lib/modules/$(uname -r)/kernel/drivers/net/wireless/8188eu.ko
sudo depmod -a
sudo reboot

3. Configure wireless network

After this is done, it is time to configure your network. You’ll have to edit your network interface as well as wpa_supplicant file, which contains the details for your network. Since you don’t want the IP address to change every time the Pi reboots, you have to give it a static IP address. First, do sudo nano /etc/network/interfaces, and change the line iface wlan0 inet dhcp to

iface wlan0 inet static
address yourAddress
netmask yourNetmask
gateway yourGateway

If you’re unsure of these values, do a ifconfig to find the current IP address and netmask, and route -nee to find the current default gateway.

After you’re done, edit your network details by doing sudo nano etc/wpa_supplicant/wpa_suppicant.conf. By default, these two lines should be at the top:

ctrl_interface=DIR=/var/run/wpa_supplicant GROUP=netdev
update_config=1

After these two lines, edit the file to look like the following:

network={
    ssid="yourNetworkSSID"
    psk="yourNetworkPassword"
}

The above is the simplest example for a WPA authenticated network, but since the NUS network uses a different kind of authentication, it’s a little more complicated than that.

network={
    ssid="NUS"
    proto=RSN
    key_mgmt=WPA-EAP
    pairwise=CCMP
    auth_alg=OPEN
    eap=PEAP
    identity="yourUsername"
    password="yourPassword"
}

This will get you connected to the NUS network. If your Wi-Fi connection drops though, you’re gonna have trouble reconnecting to your Pi again. So, to prevent that, we set up a script which checks the connection every minute, and reconnects to the network if it’s down. Put the following script in /usr/local/bin/network-monitor.sh:

#!/bin/bash

TESTIP=8.8.8.8

ping -c4 ${TESTIP} > /dev/null

if [ $? != 0 ]
then
    logger -t $0 "WiFi has gone down- run ifup"
    /sbin/ifdown --force wlan0
    /sbin/ifup wlan0
else
        logger -t $0 "WiFi is currently up"
fi

Finally, do sudo crontab -e and add this to the end of the file: * * * * * /usr/local/bin/network-monitor.sh. Cron is a service which starts up automatically whenever the Pi boots, so this will tell Cron to run the script every minute.

4. Set up CUPS and your printer

Now that you’re done setting up your Pi, we can finally get to installing the printer. Do sudo apt-get install cups to install CUPS, an open source printing system developed by Apple for UNIX-based operating systems. Next, do sudo usermod -a -G lpadmin username to add yourself to the admin files. After this is done, you can access CUPS on any connected computer using your Pi’s IP address, as such: yourAddress:631.

  1. Connect your printer to your Pi, and navigate to https://yourAddress:631/admin.
  2. Under Administration, click Add Printer. If prompted, login using your Pi’s username and password.
  3. Select your printer from the Local Printer list, it is probably the one with an usb in its name.
  4. Next, enter the description, location and tick Share This Printer.
  5. On the next page, choose your printer’s model from the existing list, or if it is not available, provide a PPD file corresponding to the model of your printer. These can be found easily through a simple Google search.

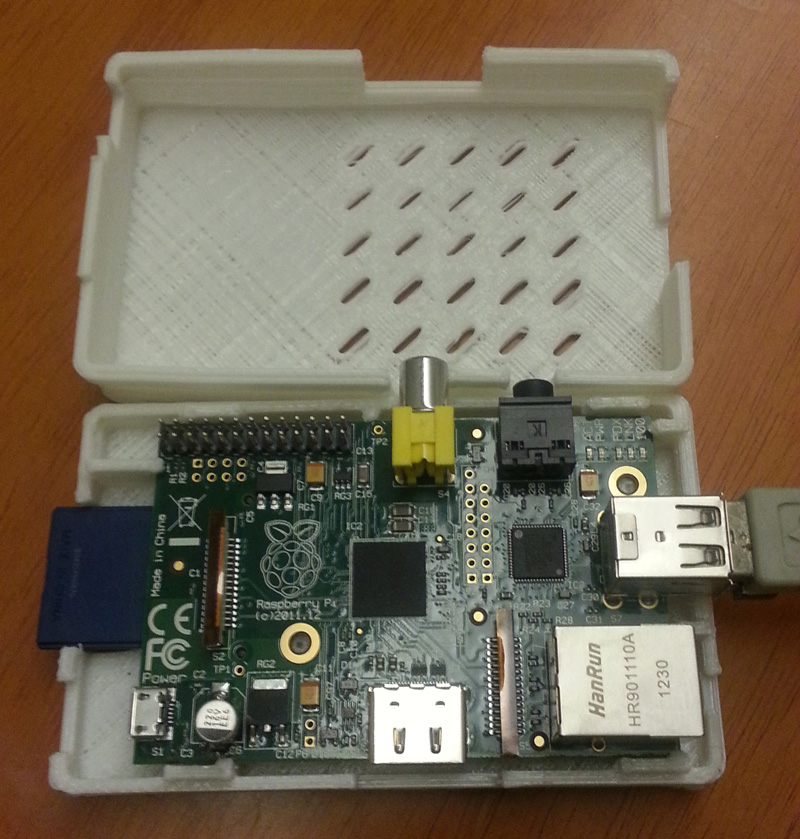
And you’re done! All you have to do now is to mount your Pi somewhere it can receive wireless signals. I 3D-printed a case from Thingiverse and mounted it on the wall beside my printer.
Final product

Now you can add your network printer to any computer that is connected within the same network. In my case, I can print from any corner of NUS!